


Alice-LiveMan 简易搭建流程
封面图:「一緒にぬくぬくしよ?」 Pixiv ID: 86401389 Member: うちゅうねこ
作为字幕组的一位转播 Man (摸鱼型)经常会为转播发愁,尤其是在梯子爆炸、OBS 崩坏、账号风控等一些(血压UP)情况下转播操作将会变得相当困难。而这种时候如果能够拥有一台服务器专门负责进行转播岂不美哉?很幸运的是这里找到了一个十分方便的程序:爱丽丝转播姬
可惜虽然找到了这个开源程序,但是几乎找遍全网都没能找到一个针对性教程,也算是美中不足吧。因此这里将会专门说明这一个实用且方便的程序的搭建流程
注意:Alice-LiveMan 使用过程中十分消耗服务器资源,如果只是转播情况相对较好,但是一旦需要使用到内容规制的时候就会对服务器 CPU 有相当的硬性要求。一般超开严重的 VPS 并不适合进行搭建(包括如腾讯、阿里大厂的轻量服务器都带不动)且会对宽带产生较大消耗,如果服务商有宽带限制,请务必不要搭建以免垃圾服务商删机。这里建议使用杜甫搭建,如果没有足够资源支持,建议使用作者现有搭建的站点也便于支持作者,下面是作者的爱发电、 Github 仓库以及站点。感谢作者创造了如此方便的程序!
- 作者爱发电:https://afdian.net/@aliceliveman
- 作者站点:https://alice.myloli.me/
- Github
准备工作
获取仓库并打包后端程序
这里的使用的系统为 CentOS7 具体操作请根据自己的系统进行变换
使用如下指令获取仓库,如果没有 Git 请自行安装(yum install git or apt-get install git 当然,你也可以 wget curl 什么的)
git clone https://github.com/nekoteaparty/Alice-Website.git
git clone https://github.com/nekoteaparty/Alice-LiveMan.git
这里使用 maven 进行打包,因此需要使用 yum install maven 安装,如果是 Ubuntu 请使用 apt-get install maven 然后将 jar 移动至一个合适目录,如 /home/alicelive/(个人习惯)
cd Alice-LiveMan/
mvn clean package
mkdir /home/alicelive
mv target/liveman-0.0.1-SNAPSHOT.jar /home/alicelive/ #注意,执行的时候你应该在 Alice-LiveMan 目录中
准备前端项目
这里为了方便,也将会移动前端项目到特定文件夹,这里使用的是 lnmp 环境因此习惯性的移动到了 /home/wwwroot/aliceweb
cd ~
mv Alice-Website /home/wwwroot/aliceweb
yum install nodejs npm -y
wget https://dl.yarnpkg.com/rpm/yarn.repo -O /etc/yum.repos.d/yarn.repo
yum install yarn -y
cd /home/wwwroot/aliceweb/
yarn install && yarn build #注意,执行的时候你应该在你指定的前端项目目录中
这样,前端也准备好了,接下来直接 run 就行了!(bushi
搭建前端站点 LNMP
如果你还没有自己的域名,你可以在 freenom.com 获取一个免费域名(不建议,如果需要长期运行,建议购置一个域名,但是不要使用 .cn 因为无隐私保护且需要实名,相当于全网公开你的个人信息),或者临时使用服务器 IP 进行接下来的操作,若如此请修改 Nginx 的默认目录
首先解析域名到你的服务器 IP 这里就不过多赘述,如果你不会域名解析,请尝试百度解决问题
lnmp vhost add

Please enter domain(example: www.lnmp.org): youdomain.com
 Your domain: youdomain.com
Enter more domain name(example: lnmp.org *.lnmp.org): Enter
Please enter the directory for the domain: youdomain.com
Default directory: /home/wwwroot/youdomain.com:
Virtual Host Directory: /home/wwwroot/youdomain.com/dist
Allow Rewrite rule? (y/n) n
You choose rewrite: none
Enable PHP Pathinfo? (y/n) n
Disable pathinfo.
Allow access log? (y/n) n
Add SSL Certificate (y/n) y
1: Use your own SSL Certificate and Key
2: Use Let's Encrypt to create SSL Certificate and Key
Enter 1 or 2: 2
注意:上述 youdomain.com 皆表示你要使用的域名,不要傻fufu的直接写 youdomain.com 当然如果你持有 youdomain.com 这个域名那就当没说吧......
接下来修改配置文件
cd /usr/local/nginx/conf/vhost/
vim youdomain.com.conf
#注意,这里你可以使用 vi vim nano 等任意编辑器,如果你使用 vim 不熟练,建议 scp 到本地操作或者使用 nano
这里附带一下 Nginx 配置文件
server
    {
        listen 80;
        #listen [::]:80;
        server_name youdomain.com ;
        index index.html index.htm index.php default.html default.htm default.php;
        root  /home/wwwroot/aliceweb/dist;

        location /api {
            proxy_pass    http://127.0.0.1:8080;
        }

        include enable-php.conf;

        location ~ .*\.(gif|jpg|jpeg|png|bmp|swf)$
        {
            expires      30d;
        }

        location ~ .*\.(js|css)?$
        {
            expires      12h;
        }

        location ~ /.well-known {
            allow all;
        }

        location ~ /\.
        {
            deny all;
        }

        access_log  /home/wwwlogs/youdomain.com.log;
    }

server
    {
        listen 443 ssl http2;
        #listen [::]:443 ssl http2;
        server_name youdomain.com ;
        index index.html index.htm index.php default.html default.htm default.php;
        root  /home/wwwroot/aliceweb/dist;

        ssl_certificate /usr/local/nginx/conf/ssl/youdomain.com/fullchain.cer;
        ssl_certificate_key /usr/local/nginx/conf/ssl/youdomain.com/youdomain.com.key;
        ssl_session_timeout 5m;
        ssl_protocols TLSv1.2 TLSv1.3;
        ssl_prefer_server_ciphers on;
        ssl_ciphers "TLS13-AES-256-GCM-SHA384:TLS13-CHACHA20-POLY1305-SHA256:TLS13-AES-128-GCM-SHA256:TLS13-AES-128-CCM-8-SHA256:TLS13-AES-128-CCM-SHA256:EECDH+CHACHA20:EECDH+CHACHA20-draft:EECDH+AES128:RSA+AES128:EECDH+AES256:RSA+AES256:EECDH+3DES:RSA+3DES:!MD5";
        ssl_session_cache builtin:1000 shared:SSL:10m;
        ssl_dhparam /usr/local/nginx/conf/ssl/dhparam.pem;

        try_files $uri $uri/ /index.html;
        location /api {
            proxy_pass    http://127.0.0.1:8080;
        }

        include enable-php.conf;

        location ~ .*\.(gif|jpg|jpeg|png|bmp|swf)$
        {
            expires      30d;
        }

        location ~ .*\.(js|css)?$
        {
            expires      12h;
        }

        location ~ /.well-known {
            allow all;
        }

        location ~ /\.
        {
            deny all;
        }

        access_log  /home/wwwlogs/youdomain.com.log;
    }
注意,这里的 127.0.0.1 为本地地址,如果你的前端后端不在同设备,请修改为你的后端地址,且注意防火墙端口开放
location /api {
    proxy_pass    http://127.0.0.1:8080;
}
这时,访问 youdomain.com 就可以看到前端页面了
安装 FFmpeg 并且启动后端程序
下载 FFmpeg
cd ~
wget https://johnvansickle.com/ffmpeg/builds/ffmpeg-git-amd64-static.tar.xz
tar -xf ffmpeg-git-amd64-static.tar.xz
cd ffmpeg*/
cp ffmpeg /usr/local/bin/
chmod 755 /usr/local/bin/ffmpeg
这时输入 ffmpeg 看到如下输出,则 FFmpeg 准备完毕
ffmpeg version N-56320-ge937457b7b-static https://johnvansickle.com/ffmpeg/  Copyright (c) 2000-2021 the FFmpeg developers
  built with gcc 8 (Debian 8.3.0-6)
  configuration: --enable-gpl --enable-version3 --enable-static --disable-debug --disable-ffplay --disable-indev=sndio --disable-outdev=sndio --cc=gcc --enable-fontconfig --enable-frei0r --enable-gnutls --enable-gmp --enable-libgme --enable-gray --enable-libaom --enable-libfribidi --enable-libass --enable-libvmaf --enable-libfreetype --enable-libmp3lame --enable-libopencore-amrnb --enable-libopencore-amrwb --enable-libopenjpeg --enable-librubberband --enable-libsoxr --enable-libspeex --enable-libsrt --enable-libvorbis --enable-libopus --enable-libtheora --enable-libvidstab --enable-libvo-amrwbenc --enable-libvpx --enable-libwebp --enable-libx264 --enable-libx265 --enable-libxml2 --enable-libdav1d --enable-libxvid --enable-libzvbi --enable-libzimg
  libavutil      56. 66.100 / 56. 66.100
  libavcodec     58.125.101 / 58.125.101
  libavformat    58. 68.100 / 58. 68.100
  libavdevice    58. 12.100 / 58. 12.100
  libavfilter     7.107.100 /  7.107.100
  libswscale      5.  8.100 /  5.  8.100
  libswresample   3.  8.100 /  3.  8.100
  libpostproc    55.  8.100 / 55.  8.100
Hyper fast Audio and Video encoder
usage: ffmpeg [options] [[infile options] -i infile]... {[outfile options] outfile}...

Use -h to get full help or, even better, run 'man ffmpeg'
启动 Alice-LiveMan
cd /home/alicelive/
java -Dadmin.room.id=187210 -jar liveman-0.0.1-SNAPSHOT.jar
#注意,187210 修改为你的直播间号,而这里的直播间号归属的账号则是 Alice 的 Admin 账号
运行第一次后,目录内结构应如下
alicelive
   ├─keys
   │  └─.key
   ├─logs
   ├─capture.js
   ├─liveman-0.0.1-SNAPSHOT.jar
   ├─phantomjs
   └─setting.bin
如果运行报错,请查看 logs 内的日志文件
登录 Alice-LiveMan 前端网页面板进行配置
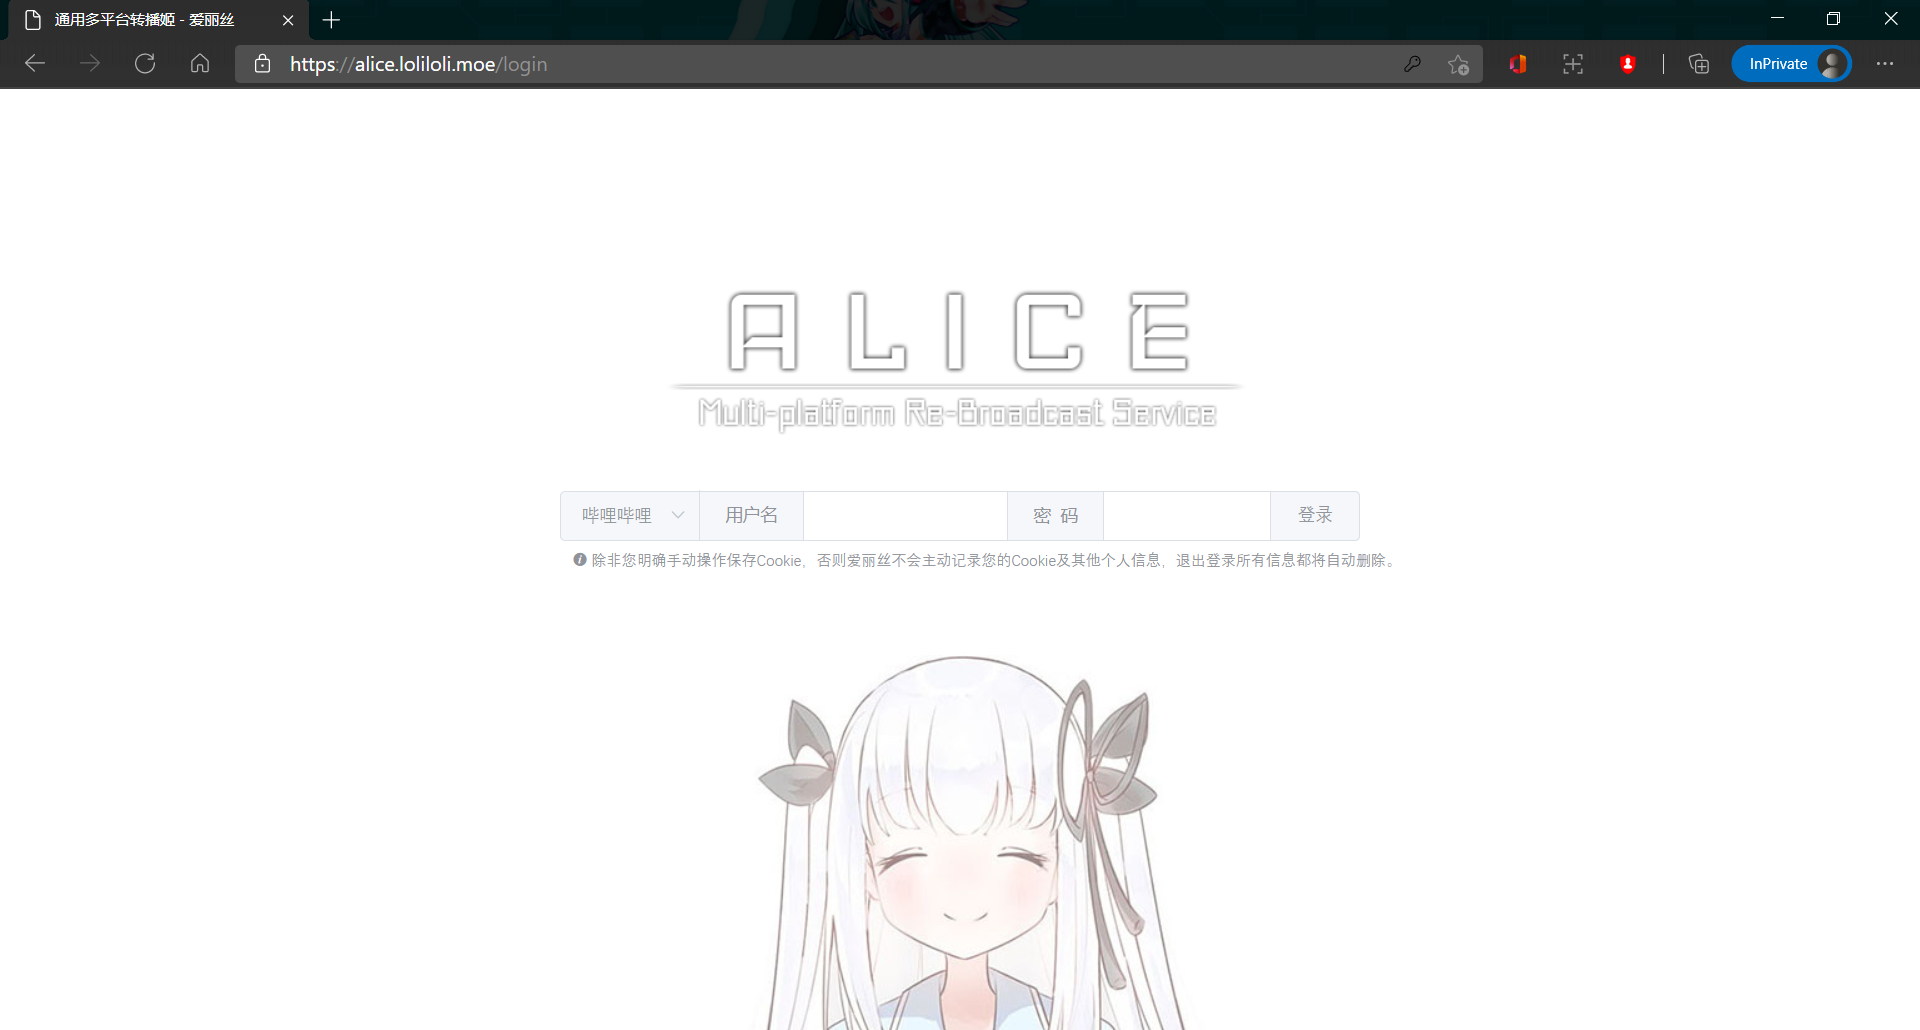
如果上述工作皆正常无误的完成,那么现在你通过 https://youdomain.com 将会看到如下界面
进入面板后选择“系统设置”可以看到如下选项

- 网页路径:youdomain.com
- FFmpeg 路径:ffmpeg(前面你已经将 ffmpeg 移动至 /usr/local/bin/ 故只填写 ffmpeg 即可)
- 其他配置按照需求填写
接下来,选择“转播服务器管理”,并且点击”添加转播服务器“,如下图
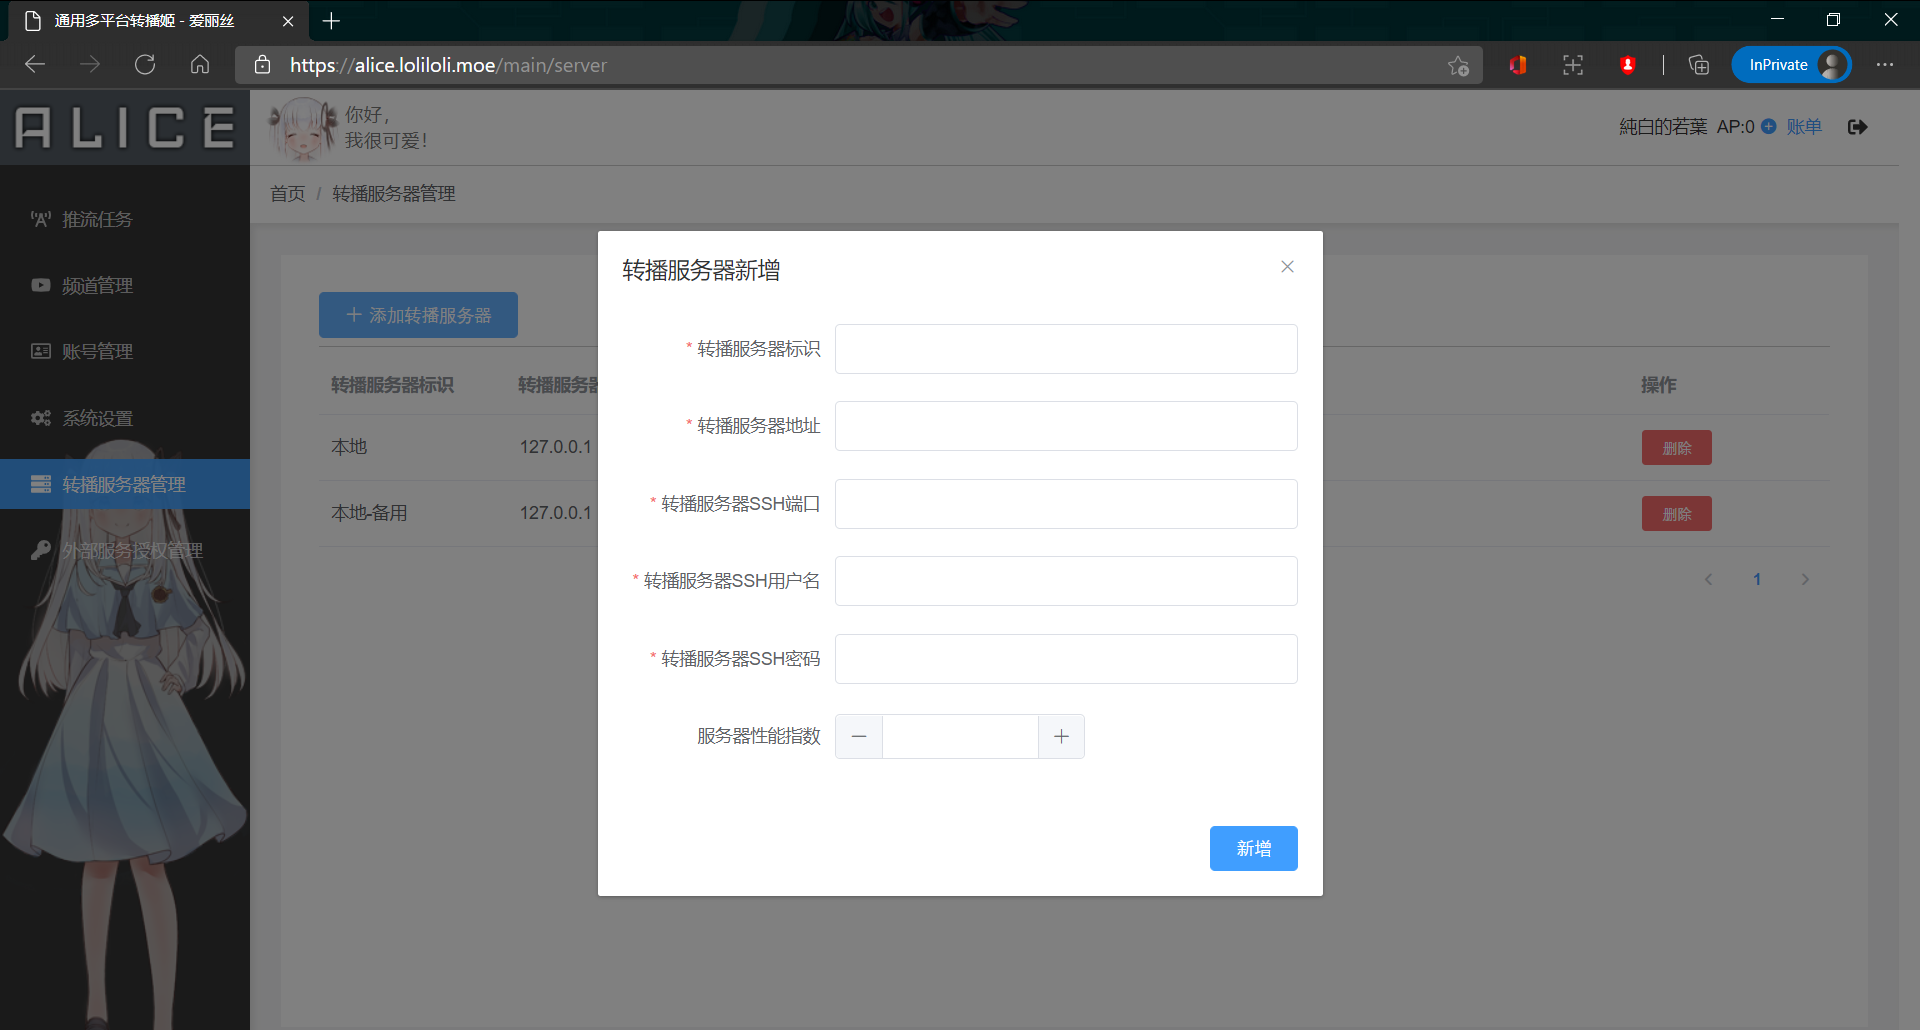
- 转播服务器标识:标签(如果你的转播服务器比较多,那么建议认真写一下标签)
- 转播服务器地址:你的转播服务器地址(例如 127.0.0.1 本地)
- 转播服务器 SSH 端口:你的 SSH 端口(默认 22 如果你有在 /etc/ssh/sshd_config 进行修改,请按照你的实际端口填写)
- 转播服务器 SSH 用户名:写 root 没问题(如果你有单独建立用户,也可以填写)
- 转播服务器 SSH 密码:你的 SSH 密码(同上)
- 服务器性能指数:2(不知道为什么,反正其他的不行直接报错,Debug 发现要求是2,如果有大佬知道为什么还望解答一下QAQ)
注意,如果这里出现报错,那么可能是你没有安装 sshpass 此时你应该 yum install sshpass -y
如此,点击新增即可。
这样,转播姬搭建就基本上完成了,至于其他的使用方法什么的,之后可能会另开一篇简单说明。
关于 2.0 版本的搭建注意事项
- 仓库位置于 2.0 分支
- 使用 Maven 时应配置 Java11 环境
- 上述采用了 yum 安装 Maven 即
yum install maven但是此方法进行安装,默认配置安装 Java8(1.8) 而并非 Java11 - 在 2.0 版本中,作者添加了 Google OAuth 以及 QQ OAuth 登录方法,具体配置相关需求下面会详细描述
拉取 2.0 版本
git clone https://github.com/NekoSunflower/Alice-Website.git -b 2.0
git clone https://github.com/NekoSunflower/Alice-LiveMan.git -b 2.0
其他操作如 上述
Maven 和 Java11 安装配置
Java11 安装
卸载 Java8(1.8) 以及 Maven
yum remove java-1.8.0* maven -y
安装 Java11
yum install java-11-openjdk -y
Mave 下载和配置
下载 Mave
cd /usr/local/
wget https://downloads.apache.org/maven/maven-3/3.8.3/source/apache-maven-3.8.3-src.tar.gz
tar -xf apache-maven-3.8.3-src.tar.gz
rm apache-maven-3.8.3-src.tar.gz
mv apache-maven-3.8.3/ maven
vim /etc/profile.d/maven.sh
环境变量配置
#!/bin/bash
export JAVA_HOME=/usr/lib/jvm/java-11-openjdk-11.0.13.0.8-1.el7_9.x86_64/
export M2_HOME=/usr/local/maven
export MAVEN_HOME=/usr/local/maven
export PATH=${M2_HOME}/bin:${PATH}
此时,使用 mvn -v 应显示类似如下信息
Apache Maven 3.6.3 (cecedd343002696d0abb50b32b541b8a6ba2883f)
Maven home: /usr/local/maven
Java version: 11.0.13, vendor: Red Hat, Inc., runtime: /usr/lib/jvm/java-11-openjdk-11.0.13.0.8-1.el7_9.x86_64
Default locale: zh_CN, platform encoding: UTF-8
OS name: "linux", version: "3.10.0-1160.6.1.el7.x86_64", arch: "amd64", family: "unix"
后续操作如 上述 无异
OAuth 配置
Google OAuth
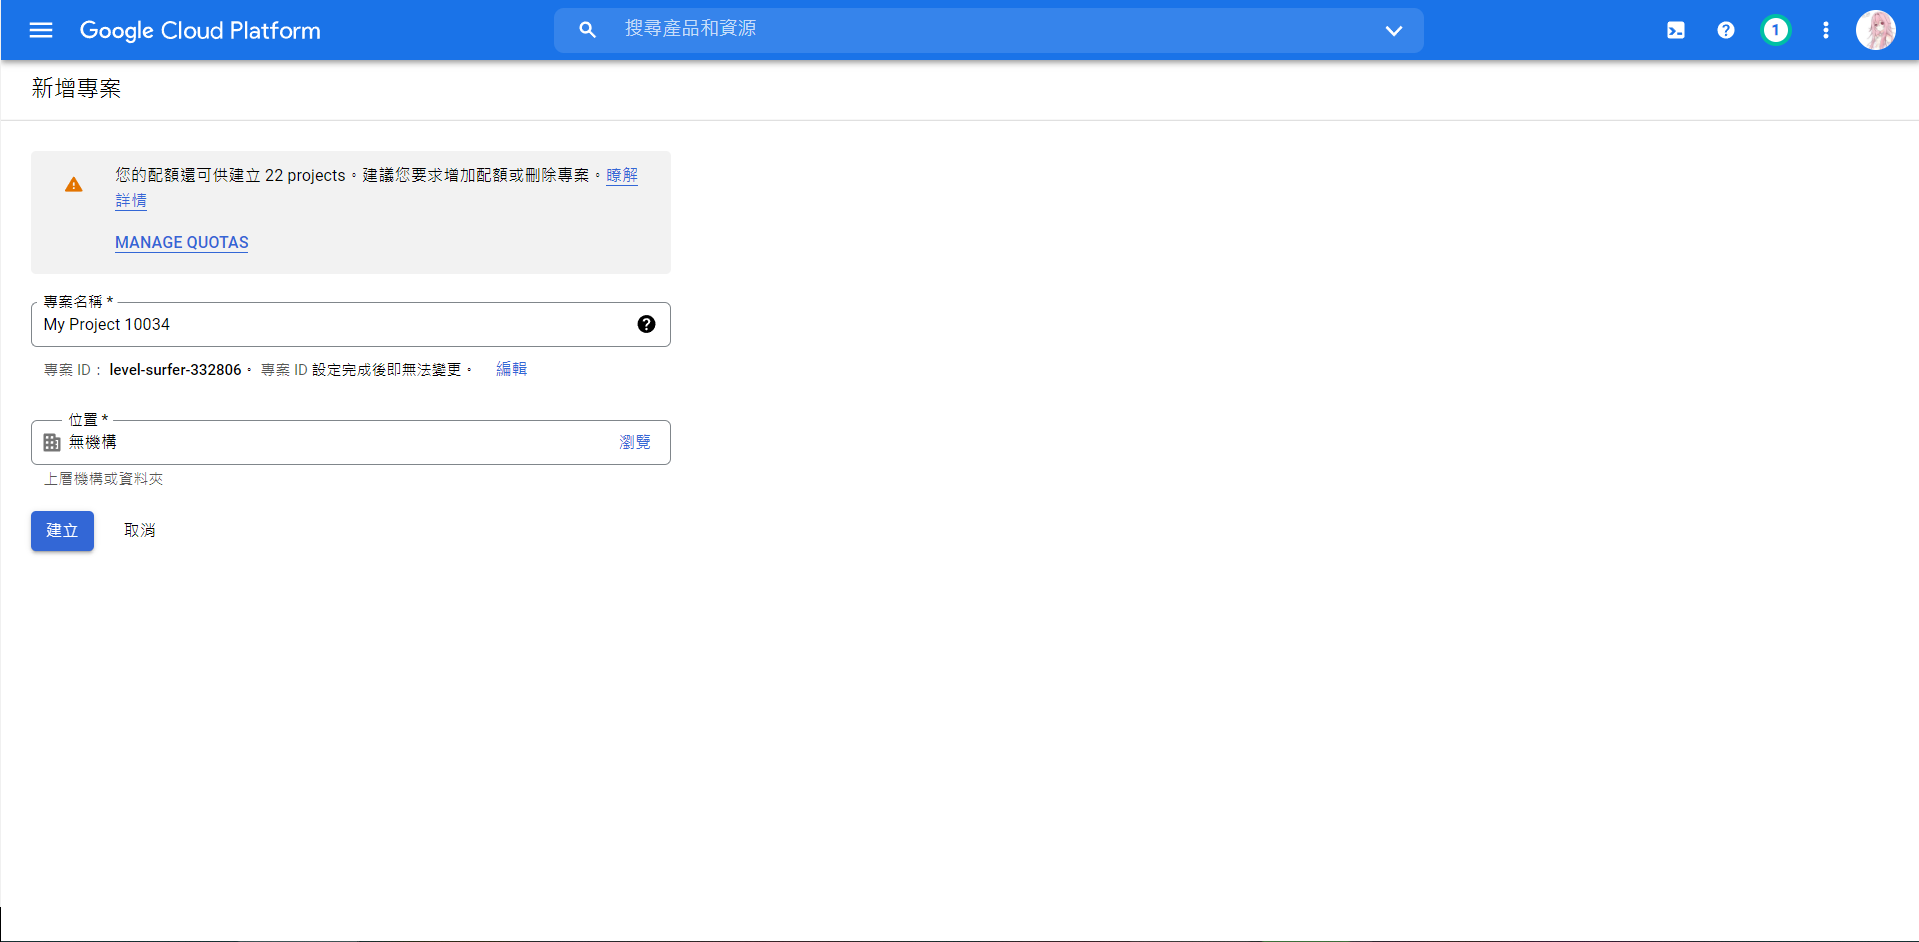
登录 Google Cloud Platform 新建一个 Project 并进入
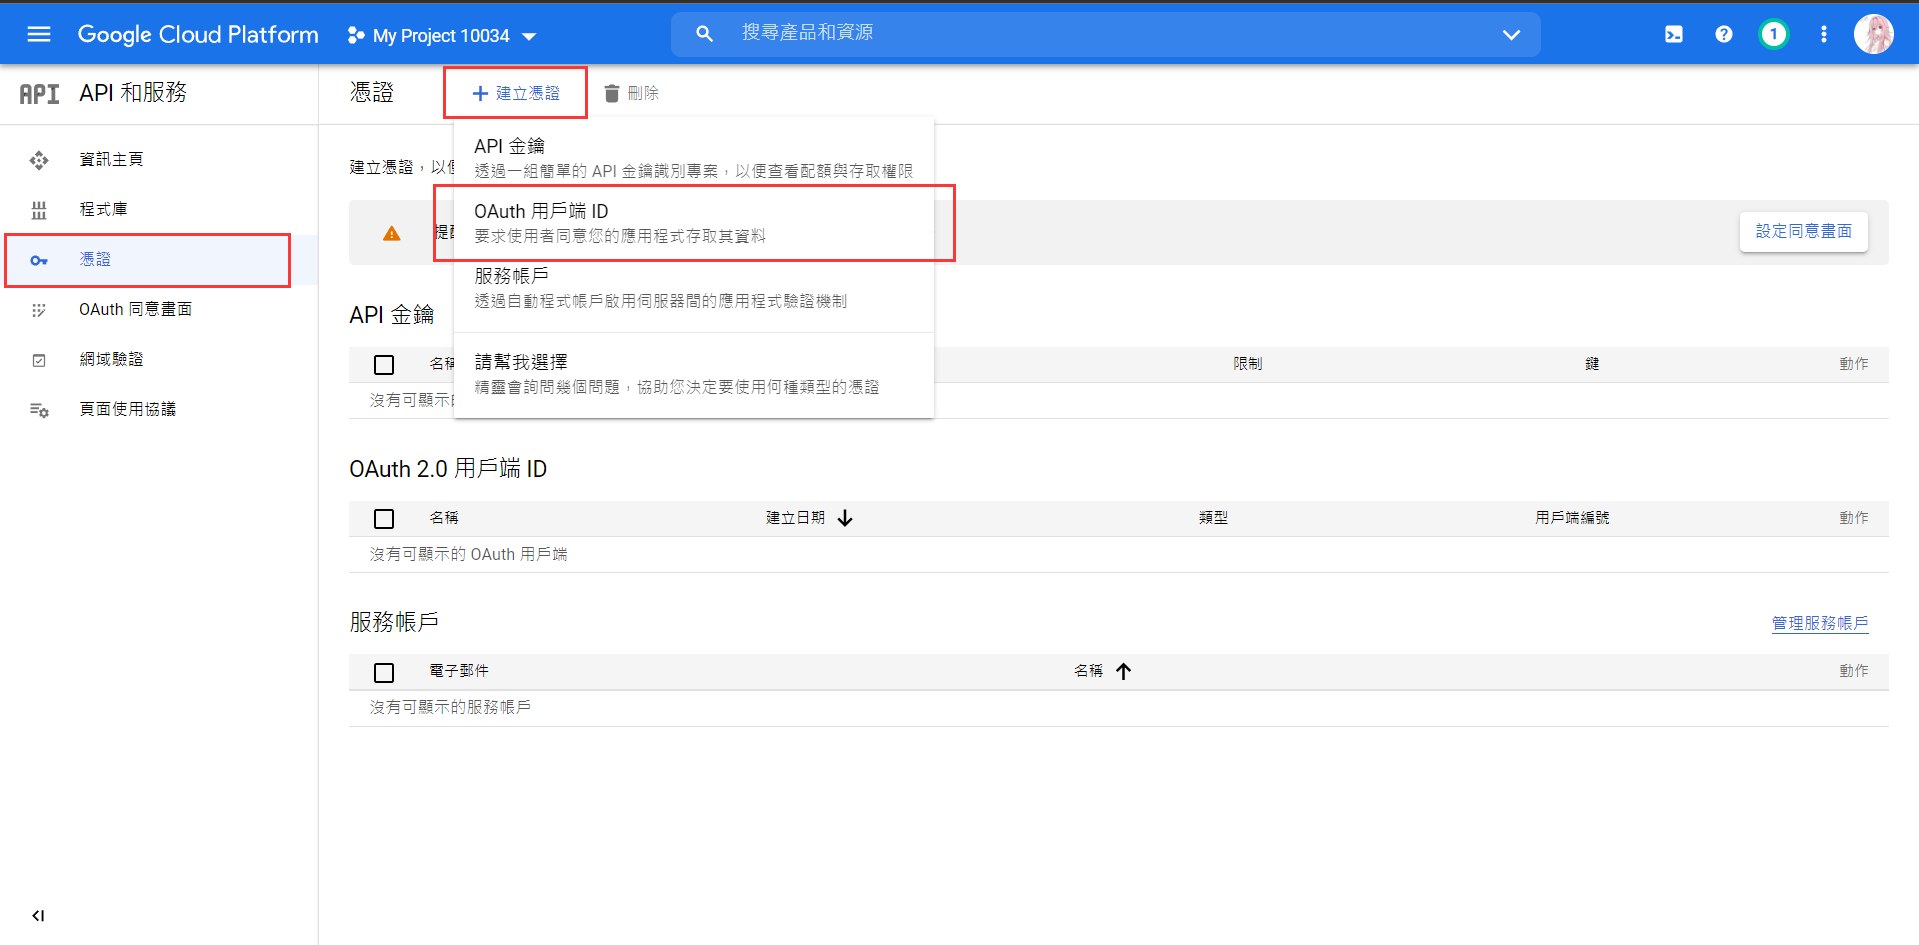
选择凭证,建立凭证,OAuth 客户端 ID
根据步骤设置 OAuth 同意页面(按需设置,故不再赘诉)
完成设置后,创建一个 网页应用程序的客户端 ID 记录 客户端 ID 以及 客户端 Key

如图设置 重定向 URL 为 https://youdomain.com/api/login/oauth2/google_oauth2/callback (youdomain.com 为你的域名)
完成上述设置后,回到已经搭建好的 Alice-LiveMan 选择 外部服务授权管理 点击添加 外部服务
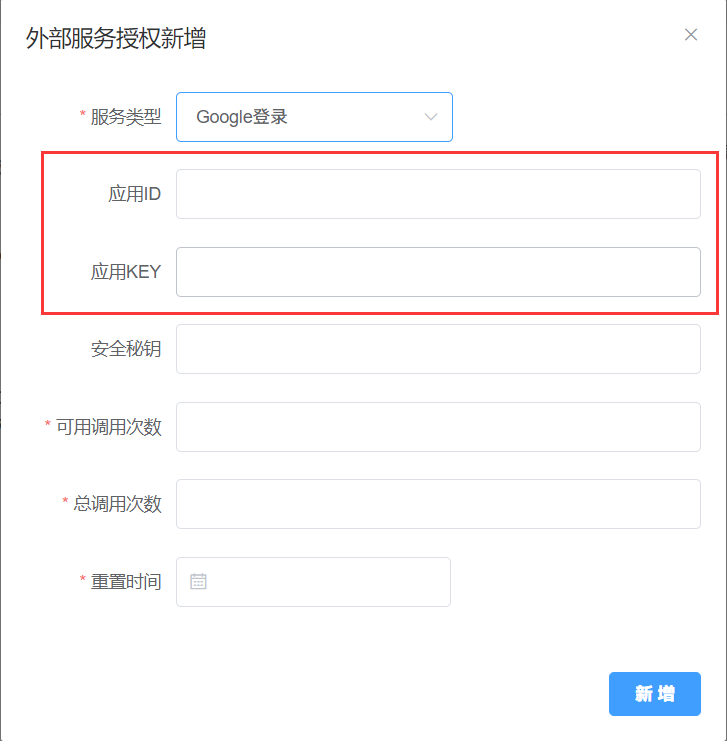
如上图,服务类型选择 Google登录 ,需要填写的为 应用ID 及 应用Key 其他空置,点击新增即配置完成
注意:完成配置后,进行登录可能出现类似下面的报错
2021-11-21 05:25:26.331 [http-nio-8080-exec-8] ERROR s.a.liveman.web.rpc.LoginController -登录失败
java.io.IOException: 403 Forbidden
 Headers:[Vary: Origin, Vary: X-Origin, Vary: Referer, Content-Type: application/json; charset=UTF-8, Date: Sun, 21 Nov 2021 05:25:26 GMT, Server: ESF, Cache-Control: private, X-XSS-Protection: 0, X-Frame-Options: SAMEORIGIN, X-Content-Type-Options: nosniff, Alt-Svc: h3=":443"; ma=2592000,h3-29=":443"; ma=2592000,h3-Q050=":443"; ma=2592000,h3-Q046=":443"; ma=2592000,h3-Q043=":443"; ma=2592000,quic=":443"; ma=2592000; v="46,43", Transfer-Encoding: chunked]
{
  "error": {
    "code": 403,
    "message": "People API has not been used in project 596624xxxxxx before or it is disabled. Enable it by visiting https://console.developers.google.com/apis/api/people.googleapis.com/overview?project=596624xxxxxx then retry. If you enabled this API recently, wait a few minutes for the action to propagate to our systems and retry.",
    "status": "PERMISSION_DENIED",
    "details": [
      {
        "@type": "type.googleapis.com/google.rpc.Help",
        "links": [
          {
            "description": "Google developers console API activation",
            "url": "https://console.developers.google.com/apis/api/people.googleapis.com/overview?project=596624xxxxxx"
          }
        ]
      },
      {
        "@type": "type.googleapis.com/google.rpc.ErrorInfo",
        "reason": "SERVICE_DISABLED",
        "domain": "googleapis.com",
        "metadata": {
          "service": "people.googleapis.com",
          "consumer": "projects/596624xxxxxx"
        }
      }
    ]
  }
}
这里只需要开启 People API 即可解决问题,链接如下
https://console.developers.google.com/apis/api/people.googleapis.com/overview
QQ OAuth
方法和 Google OAuth 基本一致
使用方法
待更新......(咕!咕!!)

Comments | 11 条评论
按教程搭建的,只不过运行在docker中,一直无法登录,后端能连接上。
2.0二维码刷不出来
照着教程做到最后运行,但是一直频道列表为空,网络小白实在不知道怎么解决
@wag R 你需要去前端面板里面添加频道,这样就不会空了
在最后运行爱丽丝时一直重复
WARN 129809 — [ task-7] site.alice.liveman.job.AutoLiveManJob : 频道列表为空!
不知道怎么做了,我是纯小白,今天第一次接触代码一类的操作https://loliloli.moe/proxy/?url=https://img.cdn.loliloli.net/images/2022/10/16/XUcG.png
大佬好,想请问一下,我在本地搭建的前后端,本地需要使用代理连接 Youtube。同时我在后端代码里发现好像
Proxy相关的方法都没有使用,所以我将create Socket()方法修改了一下,直接使用了我本机的代理来创建套接字发起请求。但是在前端测试手动推流的时候,却一直报错:org.apache.http.conn.ConnectTimeoutException: Connect to www.youtube.com:443 [www.youtube.com/69.171.242.11] failed: Read timed out。我 Google 上相关的资料翻阅了也没解决,所以想请教一下大佬应当如何处理这个问题呢?@Fajie.WangNiXi 整了半天最后自己解决了233,只需要把 HttpClient 加上代理的配置就好了?
@Fajie.WangNiXi 嗯嗯,没问题就行,然后就是抱歉现在才回复,两条评论全部给插件自动拦截成垃圾回复了,刚刚才看到
该评论为私密评论
@971759663 该评论为私密评论
该评论为私密评论