


简单部署 Nginx + Tomcat 环境方法
封面图: 進水日なので響ちゃんと涼しげに Pixiv ID: 82360786 Member: すはや
简单来说就是 Nginx 监听 80 端口并且将相关请求转发到 8080 端口的 Tomcat(如果你的 Tomcat 并非 8080 端口则按照你的配置端口操作)
这篇教程将会涉及使用腾讯轻量服务器安装 LNMP 环境、JAVA 以及配置 Nginx 和 Tomcat ,使用 Tomcat 获取真实访客 IP 等
相关链接:
- 腾讯云:https://console.cloud.tencent.com/
- LNMP:https://lnmp.org/
- Tomcat:https://tomcat.apache.org/
- Java:https://www.oracle.com/
准备服务器
这里推荐购置腾讯云轻量服务器,价格便宜实惠(如果你已经拥有需要的服务器那么,你可以跳过这一步)
购置服务器
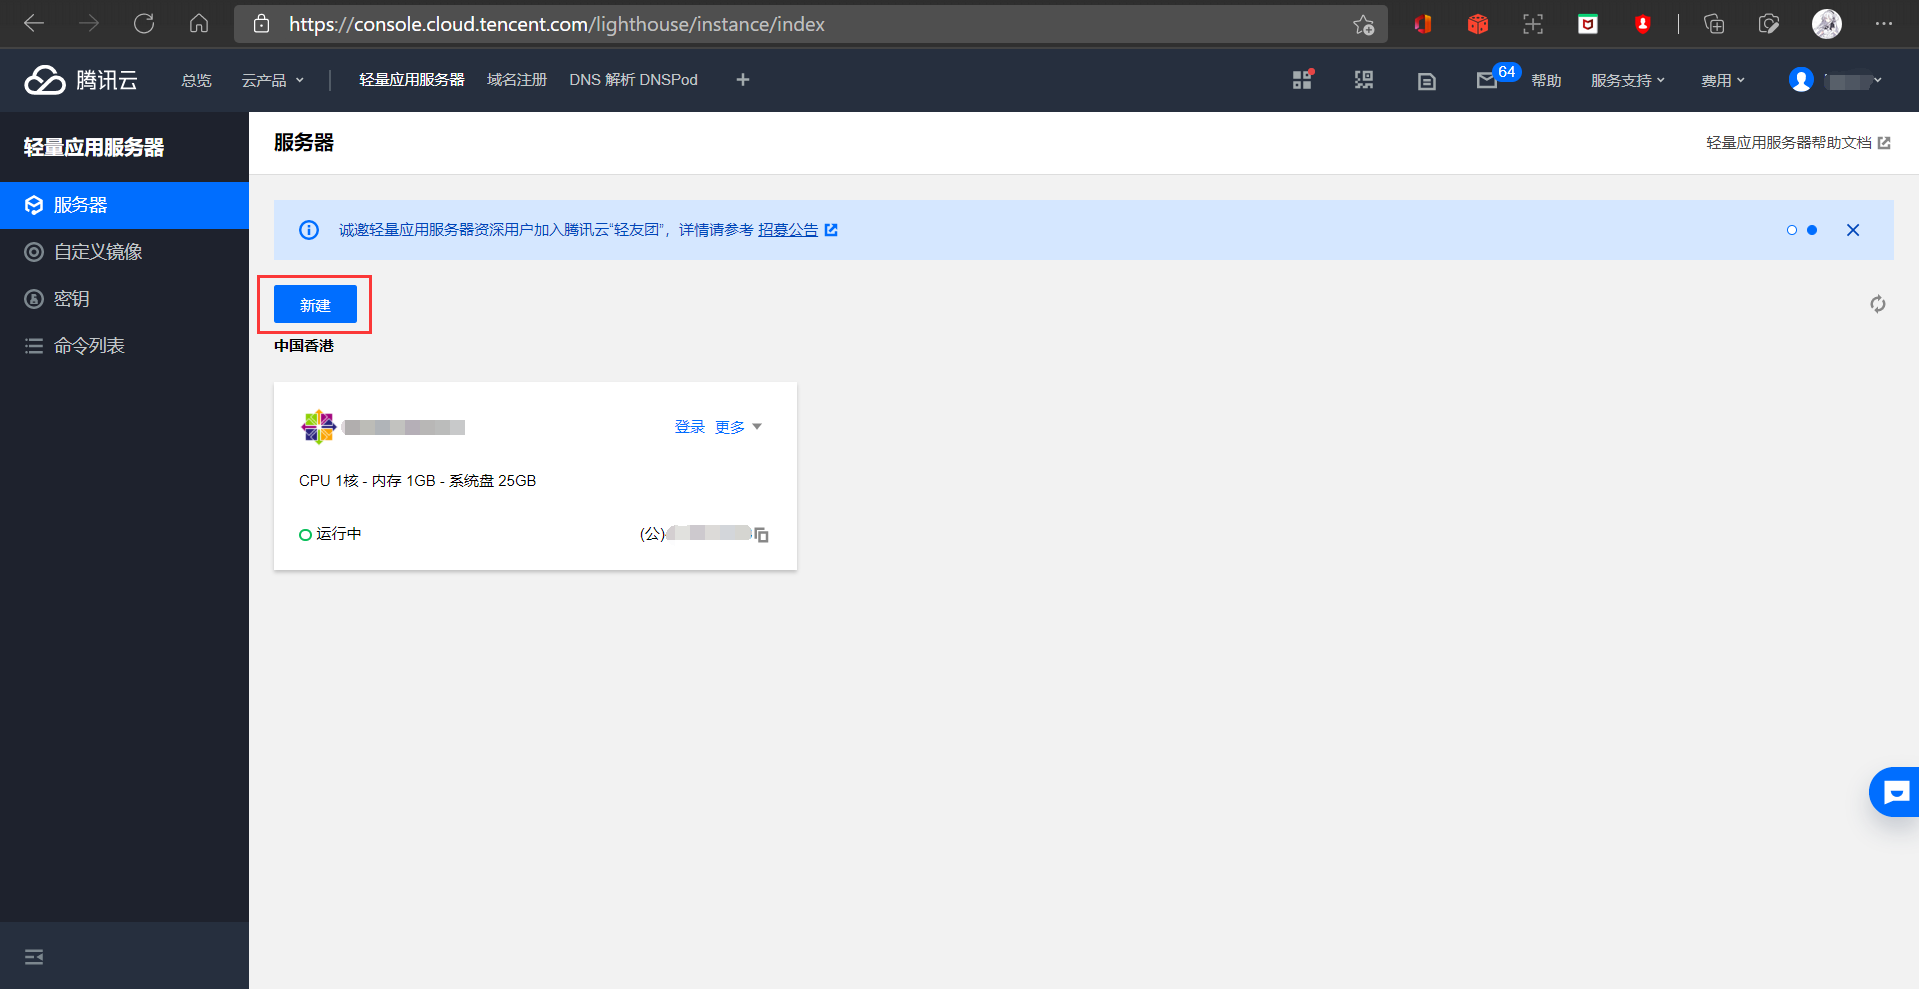
首先登录 腾讯云轻量服务器控制台 ,界面应如下,选择”新建“
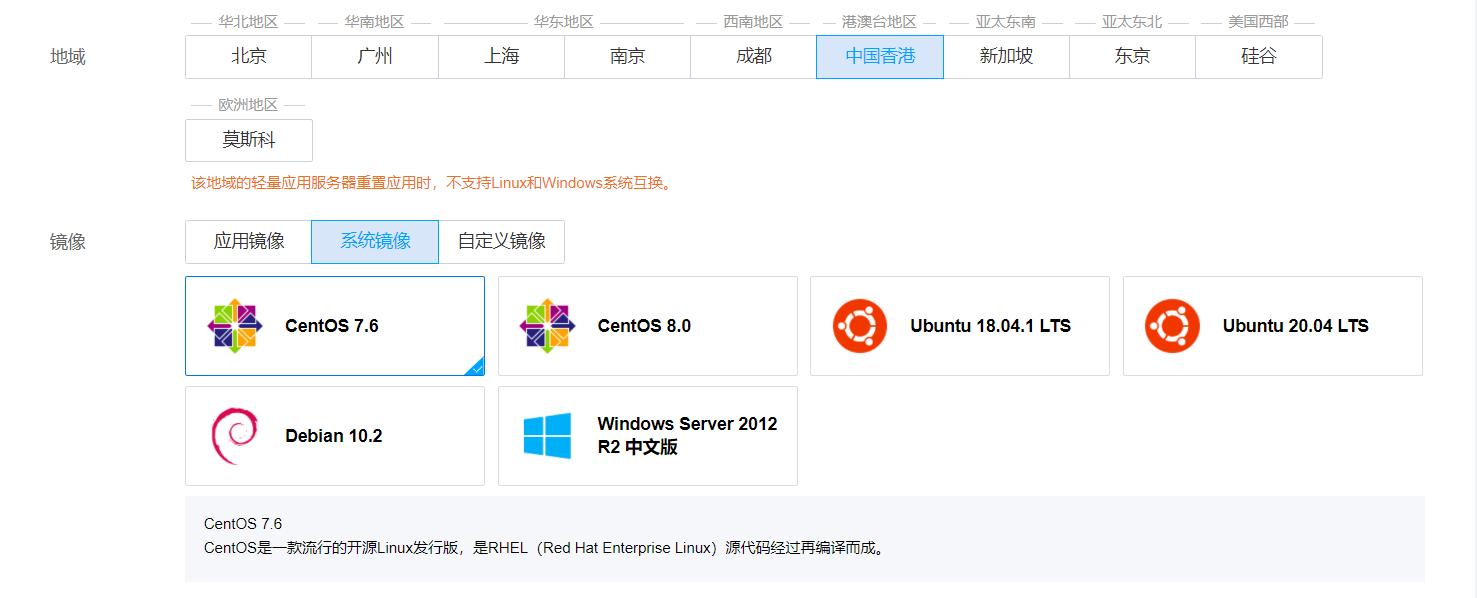
可以看到有很多地区和镜像,这里建议选择香港,速度较快且可以免备案(系统镜像按照需求选择,这里演示将会使用 CentOS7 系统)
完成购买后,进入管理修改密码,并且找到网络和域名,复制公网 IP
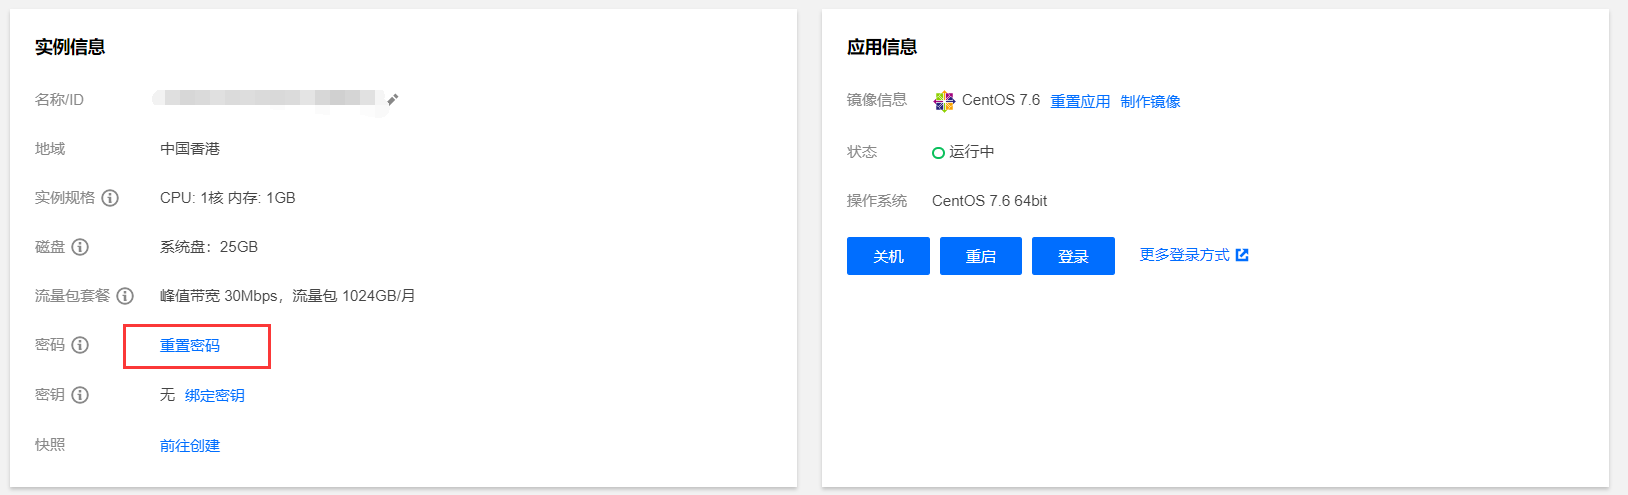

这样就可以通过 SSH 连接到服务器了
连接服务器
以下列举三种常用连接软件
PuTTY:https://www.chiark.greenend.org.uk/~sgtatham/putty/latest.html
FinalShell:https://www.hostbuf.com/t/988.html
(这里不对这些软件做更多介绍了,可以按照需求选用,如果你都不想用也可以使用 PowerShell 即 ssh -pPort root@IP or Domain 另外,以下演示将会使用 PuTTY 进行)
注意:连接服务器时的账号为 root 密码为你在上一步修改后的密码
双击打开 PuTTY 写入 IP 和 Port 点击 Open 即可,如果需要保存,则在 Saved Sessions 写入名称并且点击 Save 即可
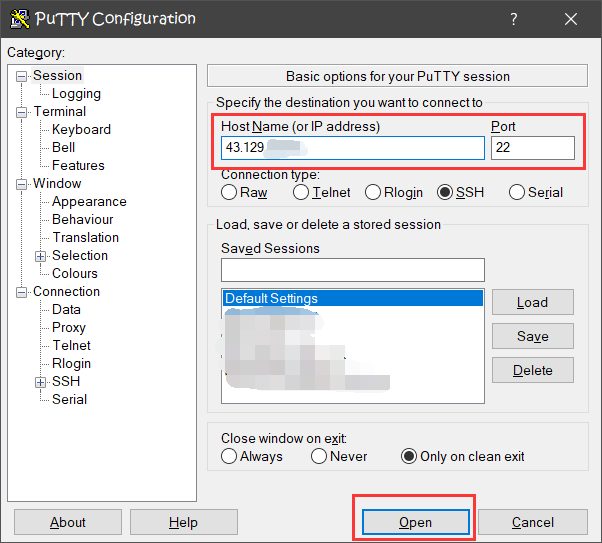
下面你将会看到 login as: 这里写入 root ,随后提示 root@IP's password: 填入你设置的密码(注意,这里密码是不会显示的,输入后回车即可,这里并非卡住了)
安装 LNMP 环境
输入如下指令
yum install screen -y
wget http://soft.vpser.net/lnmp/lnmp1.7.tar.gz -cO lnmp1.7.tar.gz && tar zxf lnmp1.7.tar.gz && cd lnmp1.7 && ./install.sh lnmp
提示如下
+------------------------------------------------------------------------+
|          LNMP V1.7 for CentOS Linux Server, Written by Licess          |
+------------------------------------------------------------------------+
|        A tool to auto-compile & install LNMP/LNMPA/LAMP on Linux       |
+------------------------------------------------------------------------+
|           For more information please visit https://lnmp.org           |
+------------------------------------------------------------------------+
You have 11 options for your DataBase install.
1: Install MySQL 5.1.73
2: Install MySQL 5.5.62 (Default)
3: Install MySQL 5.6.48
4: Install MySQL 5.7.30
5: Install MySQL 8.0.20
6: Install MariaDB 5.5.68
7: Install MariaDB 10.1.45
8: Install MariaDB 10.2.32
9: Install MariaDB 10.3.23
10: Install MariaDB 10.4.13
0: DO NOT Install MySQL/MariaDB
Enter your choice (1, 2, 3, 4, 5, 6, 7, 8, 9, 10 or 0):
这里将会安装数据库,你可以选择你需要的版本,建议选择 4: Install MySQL 5.7.30 即写入 4 回车,将会要求数据库密码,写入一个合适的密码即可
提示 Do you want to enable or disable the InnoDB Storage Engine? 默认开启回车即可
You have 9 options for your PHP install.
1: Install PHP 5.2.17
2: Install PHP 5.3.29
3: Install PHP 5.4.45
4: Install PHP 5.5.38
5: Install PHP 5.6.40 (Default)
6: Install PHP 7.0.33
7: Install PHP 7.1.33
8: Install PHP 7.2.34
9: Install PHP 7.3.23
10: Install PHP 7.4.12
Enter your choice (1, 2, 3, 4, 5, 6, 7, 8, 9, 10):
如上为 PHP 安装,按照需求安装即可,选择方法和上面 MySQL 相同,建议安装 8: Install PHP 7.2.34 即选择 8 回车,等待安装完毕(具体可参见 安装链接)
安装 Tomcat
这里选择的版本为 Tomcat 8
cd ~
wget https://mirrors.bfsu.edu.cn/apache/tomcat/tomcat-8/v8.5.63/bin/apache-tomcat-8.5.63.zip
unzip apache-tomcat-8.5.63.zip
rm -f apache-tomcat-8.5.63.zip
mv apache-tomcat-8.5.63 /usr/local/tomcat
cd /usr/local/tomcat/
现在已经进入了 Tomcat 所在目录,可以看到 Tomcat 目录大致呈现以下结构
tomcat
   ├─bin                  # Tomcat运行启动停止脚本
   ├─BUILDING.txt
   ├─conf                 # Tomcat配置文件
   ├─CONTRIBUTING.md
   ├─lib                  # Tomcat运行所需的jar文件
   ├─LICENSE
   ├─logs                 # 日志文件
   ├─NOTICE
   ├─README.md
   ├─RELEASE-NOTES
   ├─RUNNING.txt
   ├─temp                 # 临时文件
   ├─webapps              # 默认项目存放文件
   └─work                 # JSP生成的Servlet源文件和字节码文件
直接 yum 安装 Java 环境
此时直接 yum install java -y 安装 Java 环境,输入 java -version 显示如下则安装正常
openjdk version "1.8.0_282"
OpenJDK Runtime Environment (build 1.8.0_282-b08)
OpenJDK 64-Bit Server VM (build 25.282-b08, mixed mode)
注意:如不想用 yum 安装 Java 则需手动安装配置 Java 环境,但是,甲骨文很狗,下载需要注册账号,因此不做赘述
启动 Tomcat
此时确保你在 Tomcat 目录,否则先 cd 到对应目录
chmod 755 bin/*
bin/startup.sh
显示如下,则启动正常
Using CATALINA_BASE:   /usr/local/tomcat
Using CATALINA_HOME:   /usr/local/tomcat
Using CATALINA_TMPDIR: /usr/local/tomcat/temp
Using JRE_HOME:        /usr
Using CLASSPATH:       /usr/local/tomcat/bin/bootstrap.jar:/usr/local/tomcat/bin/tomcat-juli.jar
Using CATALINA_OPTS:
Tomcat started.
此时使用,lsof -i:8080 可以看到(Tomcat 默认端口为 8080 可自行修改)
COMMAND   PID USER   FD   TYPE  DEVICE SIZE/OFF NODE NAME
java    22812 root   55u  IPv6 4333119      0t0  TCP *:webcache (LISTEN)
创建站点并修改配置文件
这里选择的是配置单个站点文件,方便在服务器存在多个站点时使用 Tomcat
创建站点
解析域名到你的服务器 IP ,这个不再不过多赘述
lnmp vhost add

Please enter domain(example: www.lnmp.org): youdomain.com
 Your domain: youdomain.com
Enter more domain name(example: lnmp.org *.lnmp.org): Enter
Please enter the directory for the domain: youdomain.com
Default directory: /home/wwwroot/youdomain.com:
Virtual Host Directory: /home/wwwroot/youdomain.com/dist
Allow Rewrite rule? (y/n) n
You choose rewrite: none
Enable PHP Pathinfo? (y/n) n
Disable pathinfo.
Allow access log? (y/n) n
Add SSL Certificate (y/n) y
1: Use your own SSL Certificate and Key
2: Use Let's Encrypt to create SSL Certificate and Key
Enter 1 or 2: 2
注意:上述 youdomain.com 示你要使用的域名
修改站点配置文件
接下来进入目录
cd /usr/local/nginx/conf/vhost/
cp youdomain.com.conf youdomain.com.conf.bak
vim youdomain.com.conf
#注意,这里你可以使用 vi vim nano 等任意编辑器,如果你使用 vim 不熟练,建议 scp 到本地操作或者使用 nano
附 Nginx 配置文件
server
    {
        listen 80;
        server_name www.youdomain.com youdomain.com;
        rewrite ^ https://$server_name$request_uri? permanent;
    }

server
    {
        listen 443 ssl http2;
        server_name www.youdomain.com youdomain.com;
        index index.html index.htm index.jsp index.jspx index.do default.html default.htm default.jsp default.jspx default.do;
        root  /usr/local/tomcat/webapps;

        ssl_certificate /usr/local/nginx/conf/ssl/youdomain.com/youdomain.com.pem;
        ssl_certificate_key /usr/local/nginx/conf/ssl/youdomain.com/youdomain.com.key;
        ssl_session_timeout 5m;
        ssl_protocols TLSv1.2 TLSv1.3;
        ssl_prefer_server_ciphers on;
        ssl_ciphers "TLS13-AES-256-GCM-SHA384:TLS13-CHACHA20-POLY1305-SHA256:TLS13-AES-128-GCM-SHA256:TLS13-AES-128-CCM-8-SHA256:TLS13-AES-128-CCM-SHA256:EECDH+CHACHA20:EECDH+CHACHA20-draft:EECDH+AES128:RSA+AES128:EECDH+AES256:RSA+AES256:EECDH+3DES:RSA+3DES:!MD5";
        ssl_session_cache builtin:1000 shared:SSL:10m;
        ssl_dhparam /usr/local/nginx/conf/ssl/dhparam.pem;

        include enable-php-pathinfo.conf;

        location /{
            root html;
            index index.jsp index.jspx index.do index.html;
            proxy_pass http://localhost:8080;
            proxy_set_header Host $host;
            proxy_set_header X-Real-IP $remote_addr;
            proxy_set_header X-Forwarded-Server $host;
            proxy_set_header X-Forwarded-Proto https;
            proxy_set_header X-Forwarded-For $proxy_add_x_forwarded_for;
            proxy_redirect off;
        }
        location ~ .*\.(gif|jpg|jpeg|png|bmp|swf)$
        {
            expires      30d;
            proxy_pass http://localhost:8080;
        }

        location ~ .*\.(js|css)?$
        {
            expires      12h;
            proxy_pass http://localhost:8080;
        }

        location ~ /.well-known {
            allow all;
        }

        location ~ /\.
        {
            deny all;
        }

        access_log off;
    }
此时完成 reload 后,访问你的域名,将可以直接看到如下网页,则证明操作正常

修改 Tomcat 配置文件以获取客户端真实 IP
进入目录
cd /usr/local/tomcat/conf/
vim server.xml
在 Host 区域可以看到
<Host name="localhost" appBase="webapps"
unpackWARs="true" autoDeploy="true">
<!-- SingleSignOn valve, share authentication between web applications
Documentation at: /docs/config/valve.html -->
<!--
<Valve className="org.apache.catalina.authenticator.SingleSignOn" />
-->
<!-- Access log processes all example.
Documentation at: /docs/config/valve.html
Note: The pattern used is equivalent to using pattern="common" -->
<Valve className="org.apache.catalina.valves.AccessLogValve" directory="logs"
prefix="localhost_access_log" suffix=".txt"
pattern="%h %l %u %t "%r" %s %b" />
</Host>
这里将其修改为
<Host name="localhost"  appBase="webapps"
      unpackWARs="true" autoDeploy="true">
  <Valve className="org.apache.catalina.valves.AccessLogValve" directory="logs"
         prefix="localhost_access_log" suffix=".txt"
         pattern="%{X-FORWARDED-FOR}i %l %u %t %r %s %b %D %{User-Agent}i" resolveHosts="false" />
  <Valve className="org.apache.catalina.valves.RemoteIpValve" />
</Host>
这样就可以获取客户端真实 IP 了
至此,适用于单个站点的 Nginx + Tomcat 就部署好了,至于 Tomcat 集群方面的,下次再说(咕了

Comments | 1 条评论
该评论为私密评论